
Freight Quote
- Go to the FreightPop site https://app.freightpop.com/ and enter your login credentials.
- To obtain a quote make sure to go to the “Quote” tab. (Figure 1)
Figure 1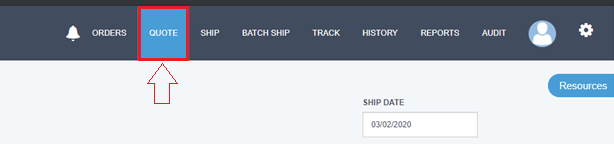
- To obtain a quote make sure to go to the “Quote” tab. (Figure 1)
- Quote using full location details
- New locations will be entered in the “From” window. (Figure 2)
Below information will be needed with an option to save in address book for future shipments. (Figure 3)- Company Name
- Attention To (optional)
- Street Address 1
- Street Address 2 (e.g. suite, apt, unit#)
- City
- Zip
- State
- Country
- Email (optional)
- Phone (max 10 character, do not input dashes)
- Save to Address Book (optional)
Once information is filled out, click SAVE button to complete.
- Saved locations will be entered in the “Address Book” window. (Figure 2)
Use a previously saved address by clicking SELECT button next to address. (Figure 4)
Figure 2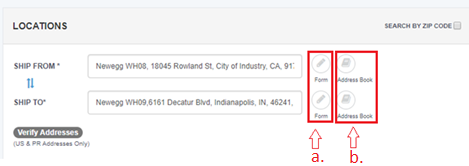
Figure 3
Figure 4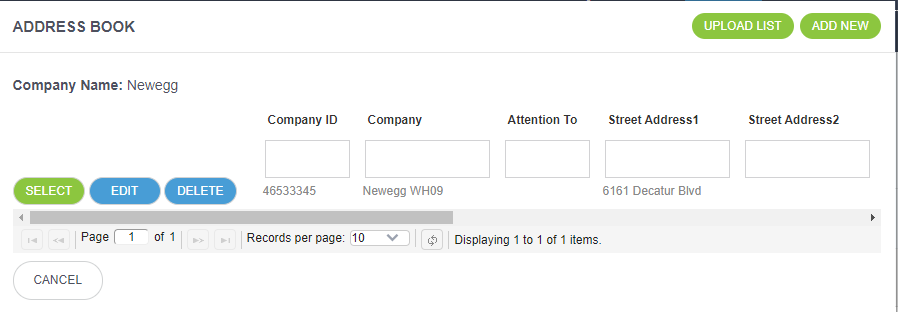
- New locations will be entered in the “From” window. (Figure 2)
- Quote using Zip codes
- Click on SEARCH BY ZIP CODE button and enter desired zip code into the Ship From and Ship To fields (Figure 5)
Figure 5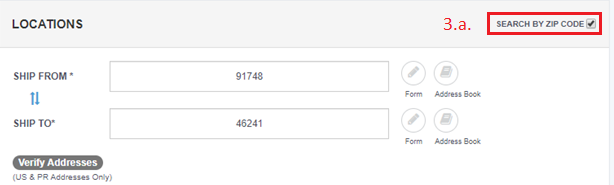
- Click on SEARCH BY ZIP CODE button and enter desired zip code into the Ship From and Ship To fields (Figure 5)
- Input Shipment Details Below information will be needed in order to generate a quote. (Figure 6)
- Quantity (Number of pallets or Container types if quoting for TL)
- Type (Pallet, Container, Truck, etc.)
- Dimension
- Weight
- Freight Class (Will auto populate using dimensions and weight)
- Description (Commodity)
*To add additional pallets of different sizes or weight click on Add Package button
*To add carton information click on INNER PIECES button, this will add a carton count to BOL. (Figure 7)
*Default measurements are in Lbs/Ins. This can be changed by clicking on Kgs/Cms button
*If you only have the weight for the total shipment, click on the Total Per Line button to quote based on total weight instead of per pallet weight
Figure 6
Figure 7
- Input reference numbers and product information. (optional)
- Use the space for SO NUMBER and PO NUMBER to add reference numbers to BOL. (Figure 8)
*For additional reference numbers click the + button next to PO NUMBER to have an additional 4 fields of reference numbers. - To enter product details press the PRODUCT DETAILS button to open the PRODUCT DETAILS (Figure 8)
- Fill out product information if you would like to produce a packing list from FreightPop. (Figure 9)
- Use the space for SO NUMBER and PO NUMBER to add reference numbers to BOL. (Figure 8)
- Select accessorial to apply to shipment.
- To select accessorials click on the ADD button in the ACCESSORIAL/SERVICES (Figure 8)
- Select the needed accessorials in the ADDITIONAL DETAILS/SERVICES (Figure 10)
- Submit for carrier quotes
- Click on the GET RATES button to generate rates from carriers. (Figure 8)
- Rates will appear in RATE QUOTE section. (Figure 11) Note that some carriers will appear more than once due to different service levels.
Figure 8
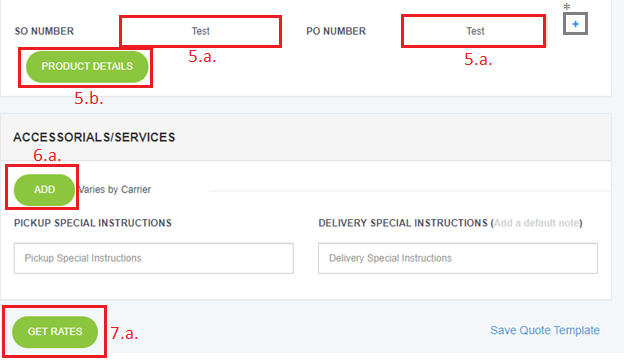
Figure 9
Figure 10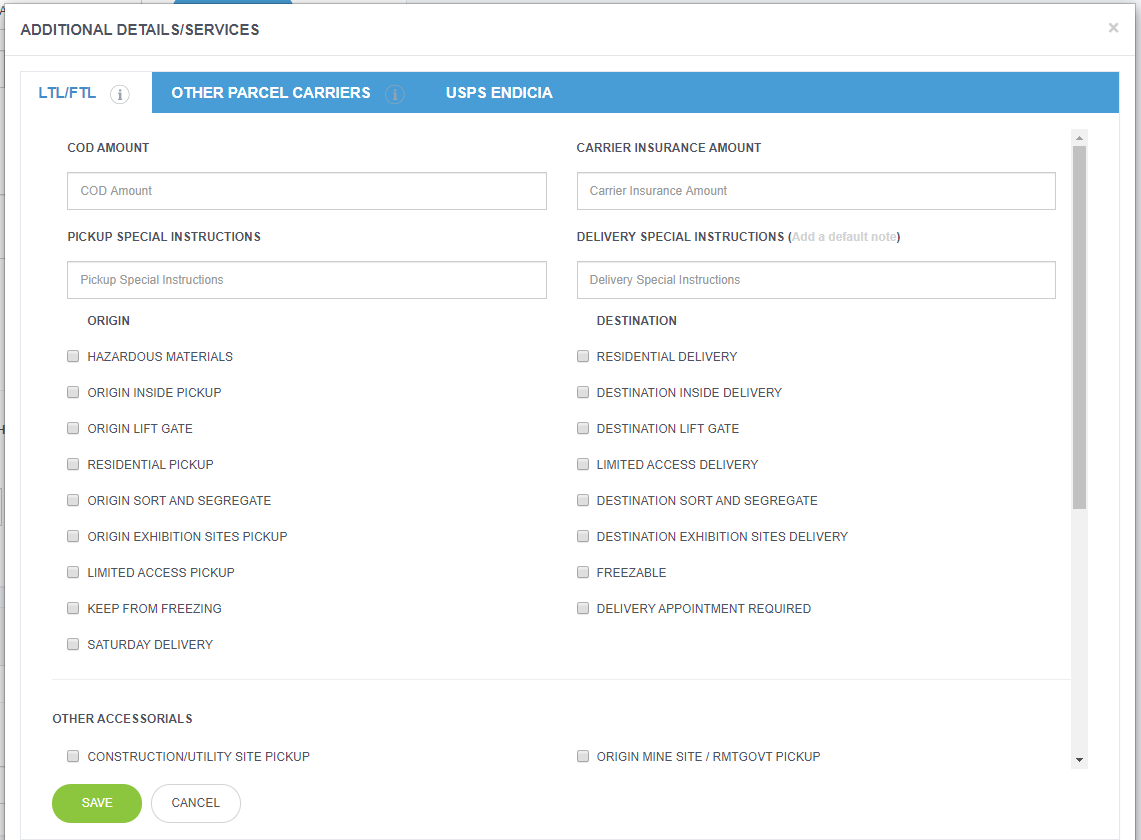
Figure 11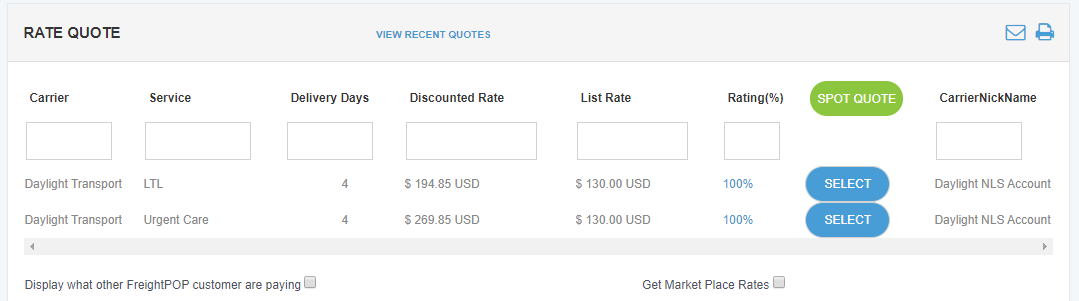


Spot Quote
For shipments above 6 pallets, it is advised to request a spot quote. Spot Quotes will take longer than the normal quote feature.
- Information for the shipment will be entered the same as outlined in the Freight Quote
- Once information is filled and quotes are generated you will click on the SPOT QUOTE button in the Rate Quote (Figure 12)
Figure 12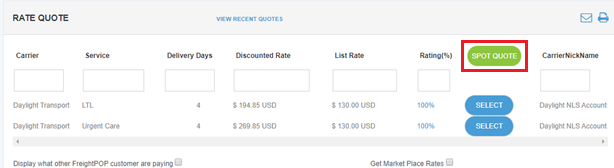
- In the SPOT QUOTE REQUEST window fill out the information requested. (Figure 13)
- Pickup date
- Arrive date (optional)
- Any special requests or requirements
- Carriers you would like to quote from
- Email (freight@newegg.com) (Figure 14)
Once information is filled click the SEND button. (Figure 14)
Figure 13
Figure 14
- Once request is sent your quote can be viewed in the RECENT QUOTE section by clicking the View Recent Quotes (Figure 15)
Figure 15
- Quotes that have a spot quote request will have a red or blue dot shown next to them.
- Red dot means that the quote is still pending response. (Figure 16)
- Blue dot means that the quote has been responded to by carrier. (Figure 17)
Figure 16
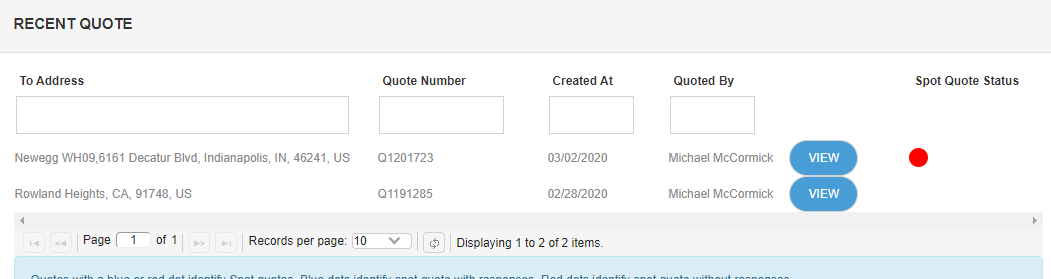
Figure 17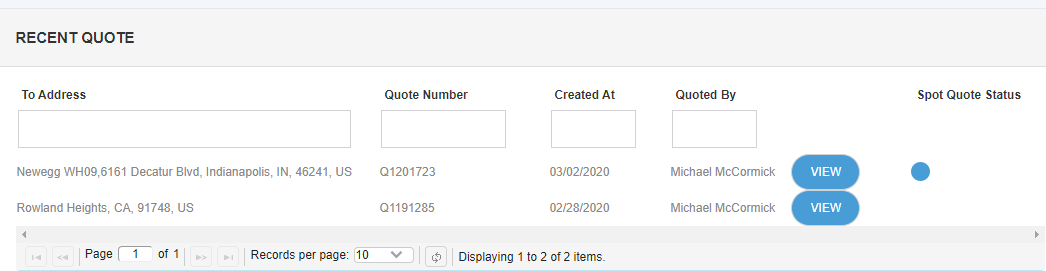
- Once a spot quote has been filled by a carrier you will receive an email confirmation as well as a notification through FreightPop. (Figure 18)
Figure 18


Shipping Using Quote
After a quote has been generated a shipment can be made using the information filled in for the quote.
- Once a quote is generated, click on the SELECT button to move to the shipping page with the information you filled in. (Figure 19)
Figure 19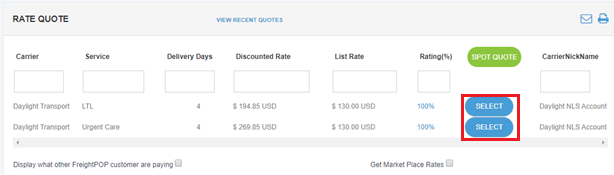
- On the ship page, information will be auto-filled from the quote information used. If quoted using only Zip codes you will need to fill out Ship to and from information.
- Once all information is filled, you will select your pickup date and pick up window for the carrier, please allow for a 2-hour window for carriers. (Figure 20)
If shipping from a Spot quote you will need to input an email address to ship. Email (freight@newegg.com).
Figure 20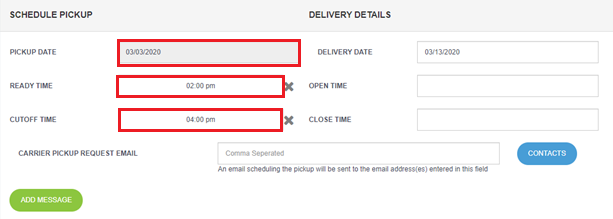
- If any additional accessorial or reference numbers need to be added, it can be added through the ACCESSORIAL/SERVICES section by clicking the ADD button. (Figure 21 / Figure 22)
*Please note that adding accessorials will affect cost and price will only update once shipment has processed.
Figure 21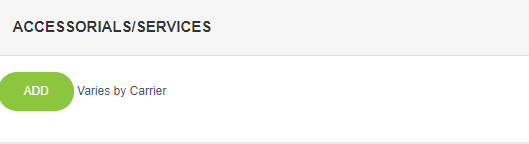
Figure 22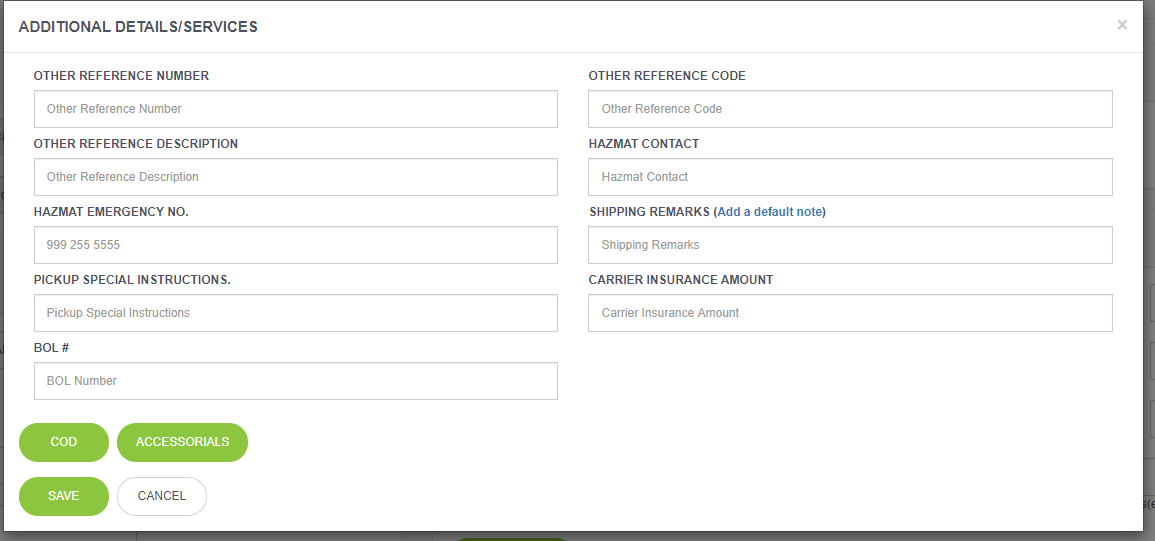
- When ready to schedule your pickup, you will click on the SHIP IT button in the CONFIRMATION section. (Figure 23)
*If you would like a confirmation email sent to you or a customer, you can input the desired emails into the SEND CONFIRMATION EMAIL TO. (Figure 23)
Figure 23
- Once pick is scheduled you will be taken to the confirmation page where you will be able to find your shipment information.
- If shipping with a connected carrier, then the process is complete and you be provided a PRO# (Figure 24) and your Shipment ID (Figure 25).
- If shipping using a spot quote, you will need to wait for the carrier to confirm your shipment.
- Shipment will first show as “Pending Confirmation” (Figure 26)
- After carrier confirms shipment will show as “Confirmed” (Figure 27)
- When carrier confirms you will receive a notification on FreightPop (Figure 28)
Figure 24
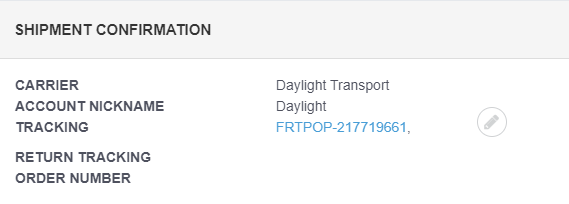
Figure 25
Figure 26
Figure 27
Figure 28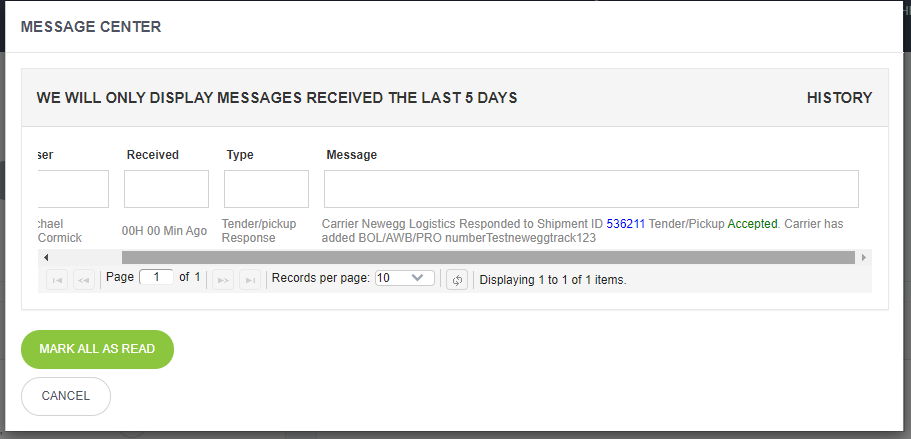
- Once confirmed you will be able to print out a copy of the BOL and Shipping label. For the automated PRO# to apply to your shipment please make sure to use the pallet labels provided through FreightPop.
- To print the BOL and Shipping label, click on the PRINT SHIPPING LABEL/BOL button under the Shipment Details sections on the confirmation page. (Figure 29)
- Both documents will pop out with the same button. (Figure 30)
Figure 29

Figure 30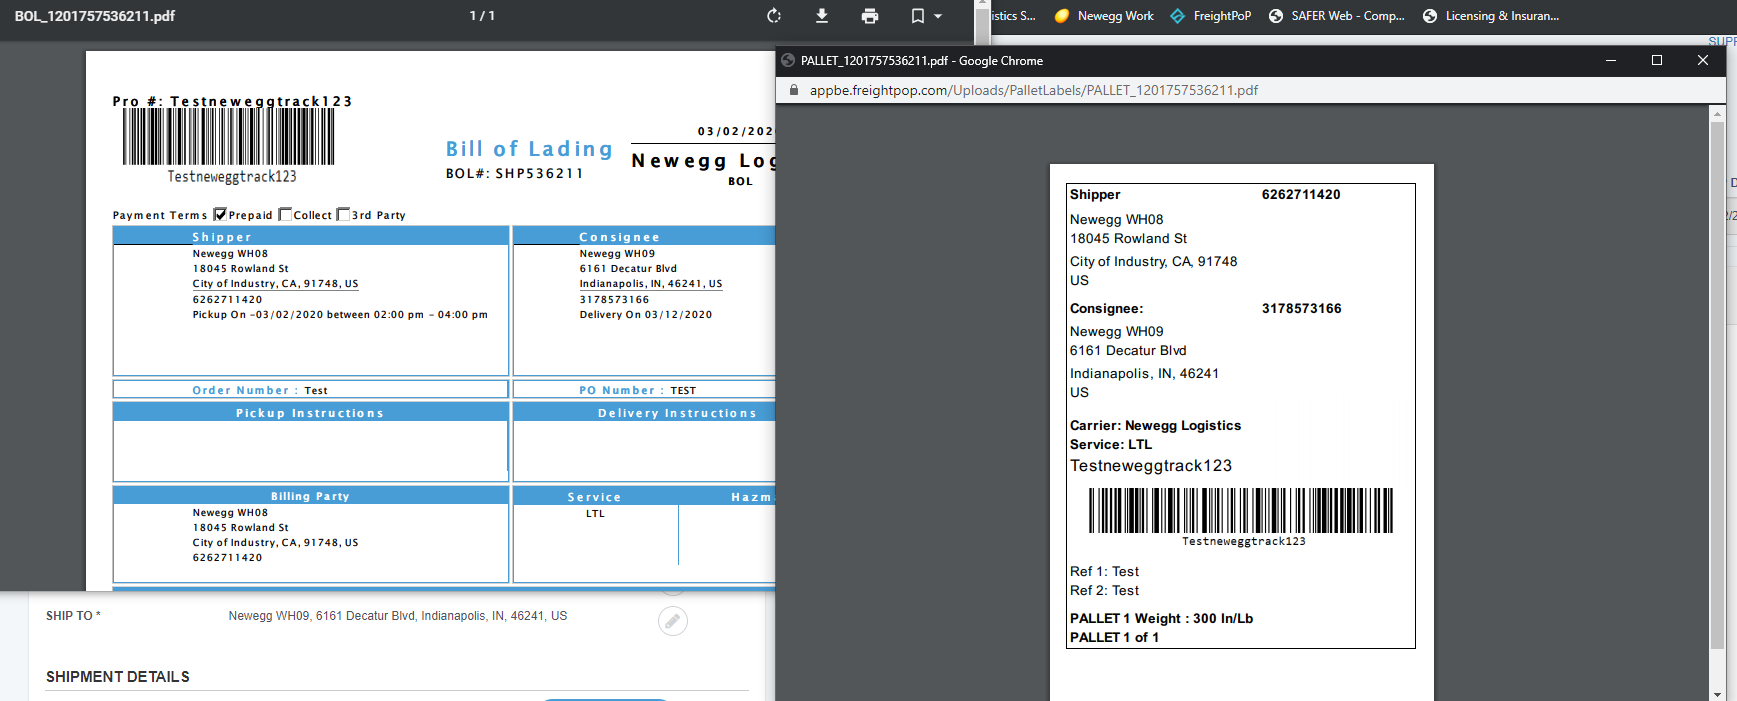


Shipping With No Quote
- Quote using full location details
- New locations will be entered in the “From” (Figure 31) Below information will be needed with an option to save in address book for future shipments. (Figure 32)
- Company Name
- Attention To (optional)
- Street Address 1
- Street Address 2 (e.g. suite, apt, unit#)
- City
- Zip
- State
- Country
- Email (optional)
- Phone (max 10 character, do not input dashes)
- Save to Address Book (optional)
- Saved locations will be entered in the “Address Book” (Figure 31) Use a previously saved address by clicking SELECT button next to address. (Figure 33)
Figure 31

Figure 32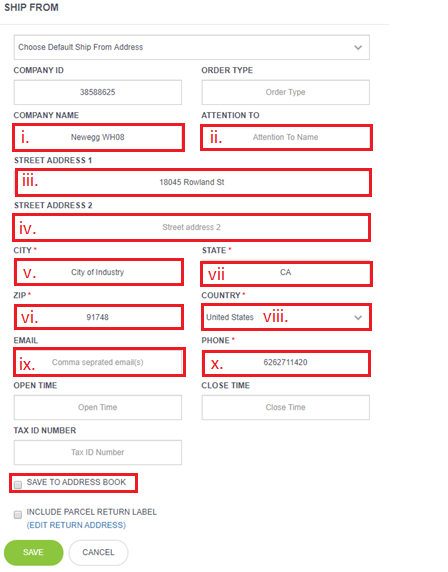
Figure 33
- New locations will be entered in the “From” (Figure 31) Below information will be needed with an option to save in address book for future shipments. (Figure 32)
- Input Shipment Details
Below information will be needed in order to generate a quote. (Figure 34)- Quantity (Number of pallets or Container types if quoting for TL)
- Type (Pallet, Container, Truck, etc.)
- Dimensions
- Weight
- Freight Class (Will auto-populate using dimensions and weight)
- Description (Commodity)
*To add additional pallets of different sizes or weight click on Add Package button
*To add carton information click on INNER PIECES button, this will add a carton count to BOL. (Figure 35)
*Default measurements are in Lbs/Ins. This can be changed by clicking on Kgs/Cms button
*If you only have the weight for the total shipment, click on the Total Per Line button to quote based on total weight instead of per pallet weight.
Figure 34
Figure 35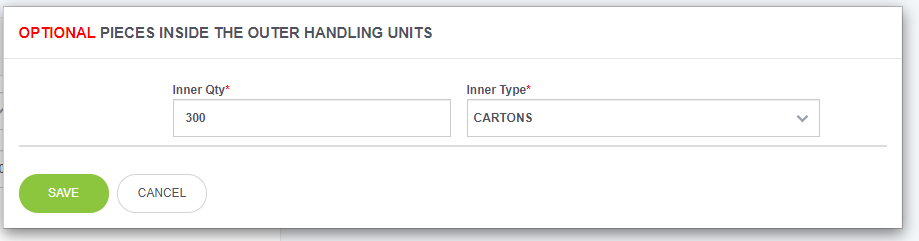
- Input reference numbers and product information. (optional)
- Use the space for SO NUMBER and PO NUMBER to add reference numbers to BOL. (Figure 36)
*For additional reference numbers click the + button next to PO NUMBER to have an additional 4 fields of reference numbers. - To enter product details press the PRODUCT DETAILS button to open the PRODUCT DETAILS (Figure 36)
- Fill out product information if you would like to produce a packing list from FreightPop. (Figure 37)
- Use the space for SO NUMBER and PO NUMBER to add reference numbers to BOL. (Figure 36)
- Select accessorial to apply to shipment.
- To select accessorials click on the ADD button in the ACCESSORIAL/SERVICES (Figure 36)
- Select the needed accessorials in the ADDITIONAL DETAILS/SERVICES (Figure 38)
Figure 36
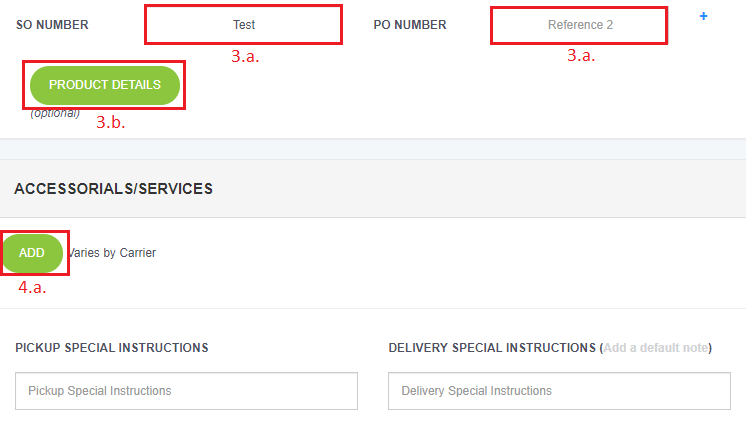
Figure 37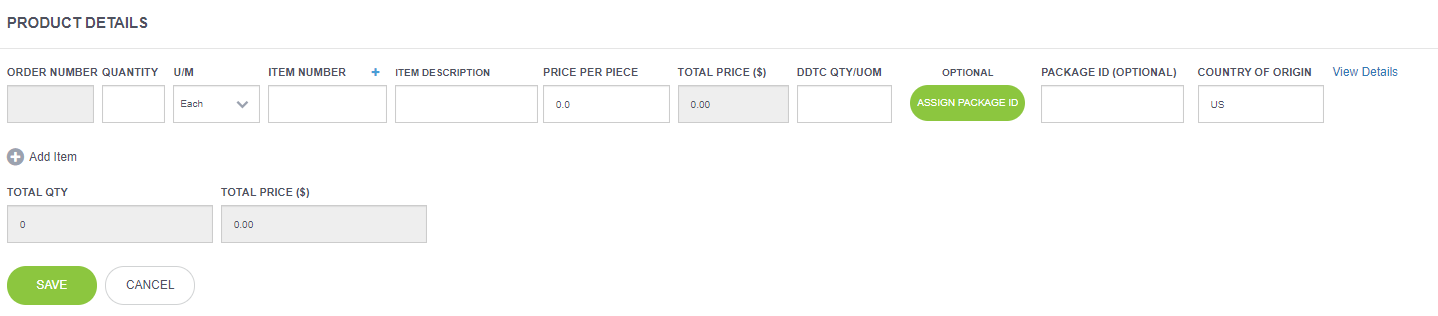
Figure 38
- Once all information is filled, you will select your pickup date and pick up window for the carrier, please allow for a 2-hour window for carriers. (Figure 39)
Figure 39
- When ready to schedule your pickup, you will click on the SHIP IT button in the CONFIRMATION section. (Figure 40)
*If you would like a confirmation email sent to you or a customer, you can input the desired emails into the SEND CONFIRMATION EMAIL TO. (Figure 40)
Figure 40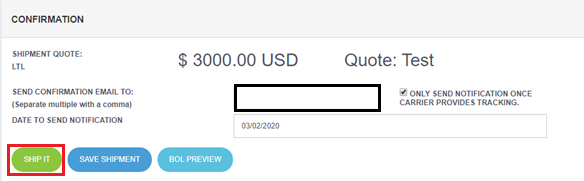
- Once pick is scheduled you will be taken to the confirmation page where you will be able to find your shipment information.
- If shipping with a connected carrier, then the process is complete and you be provided a PRO# (Figure 41) and your Shipment ID (Figure 42).
- If shipping using an unconnected carrier, you will need to wait for the carrier to confirm your shipment.
- Shipment will first show as “Pending Confirmation” (Figure 43)
- After carrier confirms shipment will show as “Confirmed” (Figure 44)
- When carrier confirms you will receive a notification on FreightPop (Figure 45)
Figure 41

Figure 42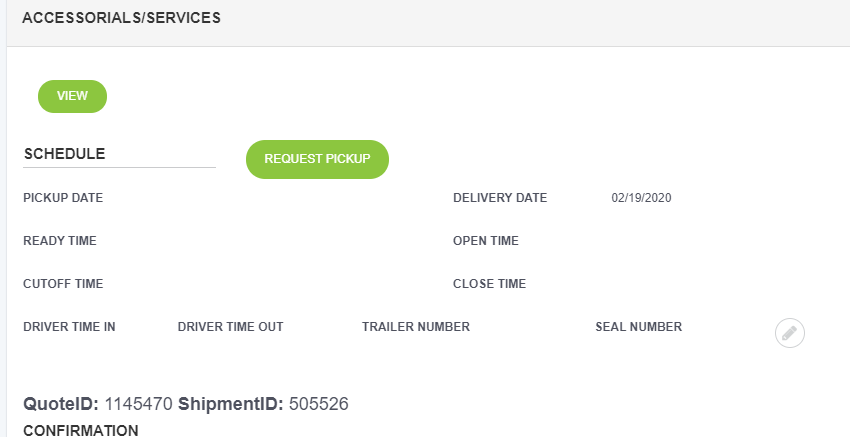
Figure 43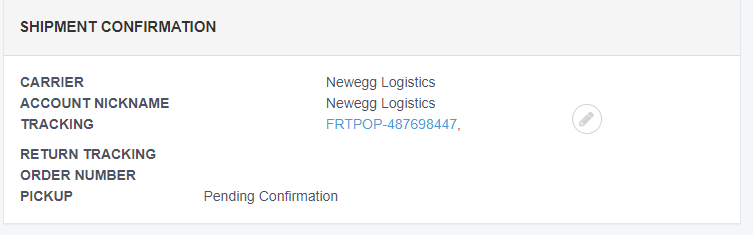
Figure 44
Figure 45
- Once confirmed you will be able to print out a copy of the BOL and Shipping label. For the automated PRO# to apply to your shipment please make sure to use the pallet labels provided through FreightPop.
- To print the BOL and Shipping label, click on the PRINT SHIPPING LABEL/BOL button under the Shipment Details sections on the confirmation page. (Figure 46)
- Both documents will pop out with the same button. (Figure 47)
Figure 46

Figure 47


